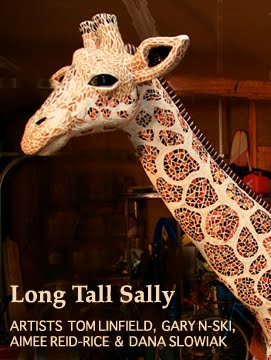

27,000 pieces of glass.
341 spots.
March 13 was a significant day. We are finished with the spots! All 321 spots are complete and attached firmly to Sally. Above are images of the final spots, waiting their turns to join all their brothers and sisters on Sally.
For all three artists, working on a three-dimensional surface was a new challenge. Sally has many curves, slopes, and crevices on her frame. Adhering glass to this changing surface can be very easy in some places and extremely challenging in other. Before adhering spots, we placed the completed, yet still-contacted-taped spot onto her body to see how the spots fit. If a spot moved across a curve, we made sure all the glass was flush to her body. We didn't want any pieces of glass jutting awkwardly from her body. We often had to cut pieces in half or cut them down to make sure they were flush. For some spots in extremely difficult areas, it was easier to create the spot right on her body, using the silicone to stick the pieces right onto her body.
We began filling in the space between the spots. This was Tom's forte, as Aimee and Dana preferred working on spots. Glass for spots tended to be a variety of geometrical shapes -- squares, triangles, and random funky shapes. We wanted the "fur" glass, as we came to call the space between the spots, to be different, to create contrast between the spots and the fur. We opted for long, thin pieces of glass. This glass we adhered directly to Sally with the silicone. Each pieces was pretty much custom fit and nipped. Tom estimated it took him about 3 hours to complete about 6 square feet of fur (and the spots were already placed).
Spots Versus Fur
Our adhesion method differed for spots and fur. The best method to adhere spots was to place our adhesive, DAP silicone caulk, onto Sally and then place the spots, contact tape still attached, into the adhesive. After about 24 hours and the silicone caulk was dry, we removed the tape. For the fur, we put some of the adhesive right onto each piece of glass and then place the glass onto Sally. It was important for both methods to not have too much adhesive and that it did not squish between glass pieces where grout should go.
What's Left?
We need to finish a lot of fur on Sally's body, including her underbelly and legs. We also will mosaic her hooves a darker color. We aren't quite sure how to finish her face. It will likely be a blend of mosaic and paint. Of course, we still need to grout. We want to use some broom bristles to create a mane for her, and we know her eye lashes are a must to perfect.
Lessons Learned
1. It took a long time to complete the spots, and our tired minds started to show. We had four spots labeled 187! Sometimes it was hard to locate the spots on her body, even though we numbered every spot. We decided a grid system would help us located spots on a future project.
2. Sally is really starting to look more complete. We now feel confident that we can have her ready for the Overture by the middle of April.
Spot Count
341 done, 0 to go!


Congratulations on spot completion! Sally is BEAUTIFUL!
ReplyDelete